- Knowledge Base
- Remote Audit Manager
- Receiving A Shared Standard
-
FAQs
-
Activation Process
-
One Pagers
-
Document Request Manager
-
Settings- Company Settings
-
Settings- Company Users Email & Security
-
Supply Chain Manager
-
Product Check Manager
-
Internal Document Manager
-
Production Models
-
Supplier Manager
-
Settings- Manage Products
-
Supplier Questionnaire Manager
-
Supplier Check Manager
-
Supplier Document Manager
- Tool Documentation
- Initial Setup of Supplier Document Manager
- Creating A Supplier Document Template
- Building The Document
- Approving The Document Internally Before Sending Out
- Delete Documents
- View Selected
- Sharing A Document With Suppliers To Sign Off
- Exceptions
- Sign Off Review
- Viewing A Customer Document
- Sign Off The Document
- Assign Responsibility
- Delete/Reject Selected
- Receiving & Viewing An Exception
-
Risk Assessment Manager
-
Incident Manager
- Tool Documentation
- Initial Setup
- Create Incident Forms – Supplier & Customer Confirmations
- Edit Incident Forms – Supplier & Customer Confirmations
- RASFF Notifications
- Create An Incident From The RASFF Notifications
- View Incident
- Edit Incident
- Share An Incident
- View Company Incident Shares
- View Responses From Supplier
- Request More Info
- Respond To Incident/Confirm/Close Out Incident
- Supplier Side Incident Manager
-
Remote Audit Manager
-
Specification Manager
- Tool Documentation
- Initial Setup For Specification Manager
- Creating Specification Templates
- Creating And Managing Company Specifications
- Creating and Managing Collaborative Specifications
- Creating and Managing Ingredient Specifications
- Sharing and Managing External Specifications
- Providing Customer Access To Linked Specifications
- Managing Specification Exceptions
- Viewing Specifications On The App
-
Customer Complaint Manager
-
Internal Check Manager
-
Workflow Manager
-
Stock Manager
-
Forecast Manager
-
Order Manager
-
Meeting Notes Manager
-
Customer Tool Guides
-
Traceability Manager
-
Supplier Audit Manager
- Tool Documentation
- Initial Setup
- Building A Custom Audit
- Using And Completing An Audit
- Update An Audit
- Request An Internal Review
- Mark Audit As Complete
- Notify Team Members
- Send PDF Report
- Export Full Audit Table To PDF
- Export Full Audit Table To Excel
- Recall Audit
- Reopen Audit
- Managing Activity Subscriptions
- Supplier Provided Audits
-
Purchasing & Sales Manager
-
Visit & Audit Schedule
-
Formbuilder
4.2 Uploading Evidence
There are 3 options you can chose from when uploading evidence; upload document, data form & link to item on Foods Connected. You can upload as many types of evidence you want to a single clause to show your compliance.
Step 1: Click the ‘+’ button beside the clause you want to upload evidence to.
Step 2 – Document Upload: A Modal will pop up for you to select what evidence you are uploading. If uploading a document, the following modal will show. Fill out the detail and press Save. If you want to attach more evidence to this clause press the ‘Save & Add New’ button.
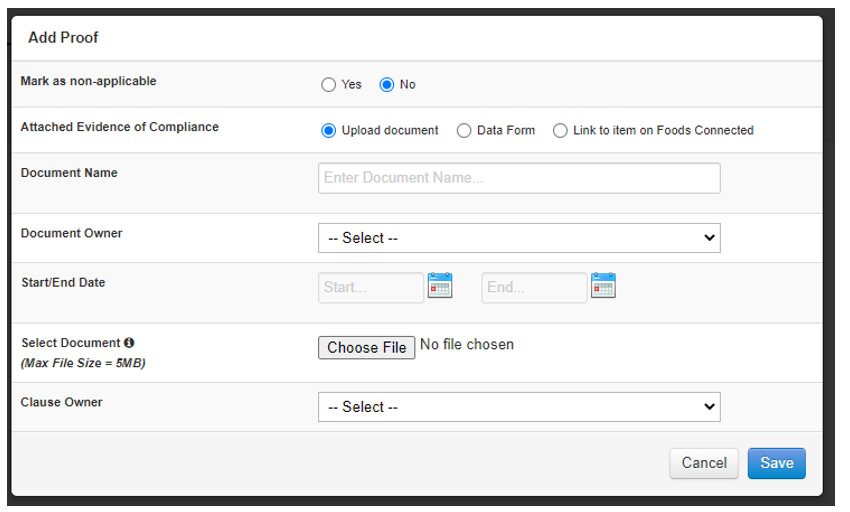
Mark as non-applicable: If the clause is not applicable to your site select Yes and fill in the reason why.
Attached Evidence of Compliance: Select Upload Document
Document Name: Name your document
Document Owner: Select the user that is the owner of this document.
Start/End Date: Select when the document starts and expires.
Select Document: Upload the document, picture, or video.
Clause Owner: Select the user that will be the owner of that clause.
Step 2 – Data Form: The following modal will show if completing the Data form. NB. This view can change due to the set up of the data form on the customer side.
Fill in the data form that the customer has created and press the Save button. This will attach as evidence to the clause.
Step 2 – Data Form: The following modal will show if completing the Data form. NB. This view can change due to the set up of the data form on the customer side.
Fill in the data form that the customer has created and press the Save button. This will attach as evidence to the clause.
Step 3 – Link to item on Foods Connected: The following modal will show if linking an existing document on Foods Connected to the clause.
Select the tool you want to link to e.g. document manager and select the item that is available in your document manager.
Select the clause owner and press Save.


