- Knowledge Base
- Workflow Manager
- Generating A New Project Workflow
-
FAQs
-
Activation Process
-
One Pagers
-
Document Request Manager
-
Settings- Company Settings
-
Settings- Company Users Email & Security
-
Supply Chain Manager
-
Product Check Manager
-
Internal Document Manager
-
Production Models
-
Supplier Manager
-
Settings- Manage Products
-
Supplier Questionnaire Manager
-
Supplier Check Manager
-
Supplier Document Manager
- Tool Documentation
- Initial Setup of Supplier Document Manager
- Creating A Supplier Document Template
- Building The Document
- Approving The Document Internally Before Sending Out
- Delete Documents
- View Selected
- Sharing A Document With Suppliers To Sign Off
- Exceptions
- Sign Off Review
- Viewing A Customer Document
- Sign Off The Document
- Assign Responsibility
- Delete/Reject Selected
- Receiving & Viewing An Exception
-
Risk Assessment Manager
-
Incident Manager
- Tool Documentation
- Initial Setup
- Create Incident Forms – Supplier & Customer Confirmations
- Edit Incident Forms – Supplier & Customer Confirmations
- RASFF Notifications
- Create An Incident From The RASFF Notifications
- View Incident
- Edit Incident
- Share An Incident
- View Company Incident Shares
- View Responses From Supplier
- Request More Info
- Respond To Incident/Confirm/Close Out Incident
- Supplier Side Incident Manager
-
Remote Audit Manager
-
Specification Manager
- Tool Documentation
- Initial Setup For Specification Manager
- Creating Specification Templates
- Creating And Managing Company Specifications
- Creating and Managing Collaborative Specifications
- Creating and Managing Ingredient Specifications
- Sharing and Managing External Specifications
- Providing Customer Access To Linked Specifications
- Managing Specification Exceptions
- Viewing Specifications On The App
-
Customer Complaint Manager
-
Internal Check Manager
-
Workflow Manager
-
Stock Manager
-
Forecast Manager
-
Order Manager
-
Meeting Notes Manager
-
Customer Tool Guides
-
Traceability Manager
-
Supplier Audit Manager
- Tool Documentation
- Initial Setup
- Building A Custom Audit
- Using And Completing An Audit
- Update An Audit
- Request An Internal Review
- Mark Audit As Complete
- Notify Team Members
- Send PDF Report
- Export Full Audit Table To PDF
- Export Full Audit Table To Excel
- Recall Audit
- Reopen Audit
- Managing Activity Subscriptions
- Supplier Provided Audits
-
Purchasing & Sales Manager
-
Visit & Audit Schedule
-
Formbuilder
3.7 Adding Workflow Notes
Workflow notes can be added at any time. Workflow notes are located at the top of the page in a separate tab
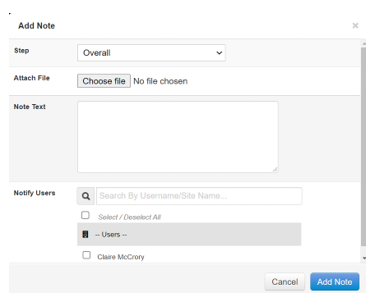
Step 1: Notes can be added for the overall project or for an individual step
Step 2: The notes will be saved and can be added to any step which has been exported to PDF
Step 3: When adding a note there is also the ability notify users of the new note. Several users/teams can be selected if there are involved in the workflow project. The user(s) will receive an email notification with note also detailed in the body of the email.
Step 4: There is also the option to attach a file when adding a note. All files attached will be visible and can be opened in the notes tab. If a note and attachment is added for a specific step this will also be available to view in the notes tab and at the bottom of the actual step in the notes section.

Step 5: When a note has been added and a user notified by using the ‘view details’ icon a model will open and display who added the note, the date and time stamp, the note itself and a list of all the users who have been notified.
