- Knowledge Base
- Stock Manager
- Stock Manager Usage
-
FAQs
-
Activation Process
-
One Pagers
-
Document Request Manager
-
Settings- Company Settings
-
Settings- Company Users Email & Security
-
Supply Chain Manager
-
Product Check Manager
-
Internal Document Manager
-
Production Models
-
Supplier Manager
-
Settings- Manage Products
-
Supplier Questionnaire Manager
-
Supplier Check Manager
-
Supplier Document Manager
- Tool Documentation
- Initial Setup of Supplier Document Manager
- Creating A Supplier Document Template
- Building The Document
- Approving The Document Internally Before Sending Out
- Delete Documents
- View Selected
- Sharing A Document With Suppliers To Sign Off
- Exceptions
- Sign Off Review
- Viewing A Customer Document
- Sign Off The Document
- Assign Responsibility
- Delete/Reject Selected
- Receiving & Viewing An Exception
-
Risk Assessment Manager
-
Incident Manager
- Tool Documentation
- Initial Setup
- Create Incident Forms – Supplier & Customer Confirmations
- Edit Incident Forms – Supplier & Customer Confirmations
- RASFF Notifications
- Create An Incident From The RASFF Notifications
- View Incident
- Edit Incident
- Share An Incident
- View Company Incident Shares
- View Responses From Supplier
- Request More Info
- Respond To Incident/Confirm/Close Out Incident
- Supplier Side Incident Manager
-
Remote Audit Manager
-
Specification Manager
- Tool Documentation
- Initial Setup For Specification Manager
- Creating Specification Templates
- Creating And Managing Company Specifications
- Creating and Managing Collaborative Specifications
- Creating and Managing Ingredient Specifications
- Sharing and Managing External Specifications
- Providing Customer Access To Linked Specifications
- Managing Specification Exceptions
- Viewing Specifications On The App
-
Customer Complaint Manager
-
Internal Check Manager
-
Workflow Manager
-
Stock Manager
-
Forecast Manager
-
Order Manager
-
Meeting Notes Manager
-
Customer Tool Guides
-
Traceability Manager
-
Supplier Audit Manager
- Tool Documentation
- Initial Setup
- Building A Custom Audit
- Using And Completing An Audit
- Update An Audit
- Request An Internal Review
- Mark Audit As Complete
- Notify Team Members
- Send PDF Report
- Export Full Audit Table To PDF
- Export Full Audit Table To Excel
- Recall Audit
- Reopen Audit
- Managing Activity Subscriptions
- Supplier Provided Audits
-
Purchasing & Sales Manager
-
Visit & Audit Schedule
-
Formbuilder
3.2 How To Complete A Supplier Stock Update Request
Step 1: Proceed to Stock Manager > Stock List > select the Export button.
Step 2: Update the Current Stock column of the Excel template and save.
Step 3: Next, select the Import button.
Step 4: The following ‘Import Stock’ box will open > populate the relevant time for the update > then select ‘Choose File’ > select your updated stock on hand Excel file > the Comment box can be used to populate any comments regarding the update > a movement type reason can be selected from the Movement Type drop down list > once completed, select the Import button.
Step 5: Note: Once the request has been made, the supplier must review the Imported Quantities screen before sending. During the review process the supplier will be notified of any trailing products that they have not requested quantities for. There is functionality to re-export to excel
and update the quantities on any product, a full history of actions on the request are stored.
Step 6: Once the stock update request has been reviewed scroll down to the bottom and select the Send Request button.
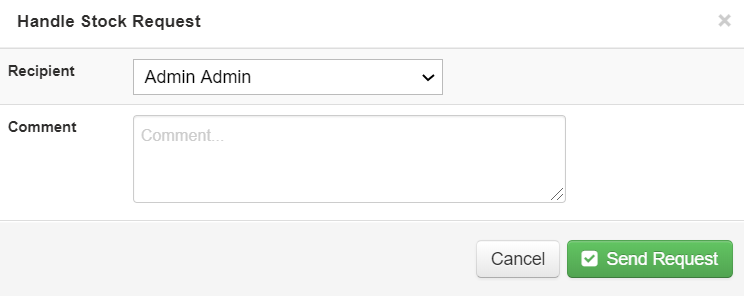
Step 7: Once the Hand Stock Request box opens > proceed to select a username from the Recipient drop down list > use the Comment box to add any additional notes > select Send Request.
Step 8: The system should automatically proceed to the Stock Manager > Stock Update Requests screen where the stock update request should display as Status: Awaiting Response.


