- Knowledge Base
- Workflow Manager
- Generating A New Project Workflow
-
FAQs
-
Activation Process
-
One Pagers
-
Document Request Manager
-
Settings- Company Settings
-
Settings- Company Users Email & Security
-
Supply Chain Manager
-
Product Check Manager
-
Internal Document Manager
-
Production Models
-
Supplier Manager
-
Settings- Manage Products
-
Supplier Questionnaire Manager
-
Supplier Check Manager
-
Supplier Document Manager
- Tool Documentation
- Initial Setup of Supplier Document Manager
- Creating A Supplier Document Template
- Building The Document
- Approving The Document Internally Before Sending Out
- Delete Documents
- View Selected
- Sharing A Document With Suppliers To Sign Off
- Exceptions
- Sign Off Review
- Viewing A Customer Document
- Sign Off The Document
- Assign Responsibility
- Delete/Reject Selected
- Receiving & Viewing An Exception
-
Risk Assessment Manager
-
Incident Manager
- Tool Documentation
- Initial Setup
- Create Incident Forms – Supplier & Customer Confirmations
- Edit Incident Forms – Supplier & Customer Confirmations
- RASFF Notifications
- Create An Incident From The RASFF Notifications
- View Incident
- Edit Incident
- Share An Incident
- View Company Incident Shares
- View Responses From Supplier
- Request More Info
- Respond To Incident/Confirm/Close Out Incident
- Supplier Side Incident Manager
-
Remote Audit Manager
-
Specification Manager
- Tool Documentation
- Initial Setup For Specification Manager
- Creating Specification Templates
- Creating And Managing Company Specifications
- Creating and Managing Collaborative Specifications
- Creating and Managing Ingredient Specifications
- Sharing and Managing External Specifications
- Providing Customer Access To Linked Specifications
- Managing Specification Exceptions
- Viewing Specifications On The App
-
Customer Complaint Manager
-
Internal Check Manager
-
Workflow Manager
-
Stock Manager
-
Forecast Manager
-
Order Manager
-
Meeting Notes Manager
-
Customer Tool Guides
-
Traceability Manager
-
Supplier Audit Manager
- Tool Documentation
- Initial Setup
- Building A Custom Audit
- Using And Completing An Audit
- Update An Audit
- Request An Internal Review
- Mark Audit As Complete
- Notify Team Members
- Send PDF Report
- Export Full Audit Table To PDF
- Export Full Audit Table To Excel
- Recall Audit
- Reopen Audit
- Managing Activity Subscriptions
- Supplier Provided Audits
-
Purchasing & Sales Manager
-
Visit & Audit Schedule
-
Formbuilder
3.11 Post Launch Review
To add a post launch review step into the individual workflow, follow these steps:
*Note; The post launch review will only work if a launch date has been assigned to a workflow.
Step 1: When in the template click on the actions tab, select add action, then choose ‘post launch review’ from the drop-down list
Step 2: Then build the post lunch review form you would like the user to fill out by clicking on the pencil icon.
Step 3: Build the form as you would build any foods connected form by adding sections and fields. Linked fields can also be used to populate the post launch review form with information captured in the workflow steps before the post launch review is due.

Step 4: Create your workflow as normal
Step 5: Load the workflow and click on the review settings tab

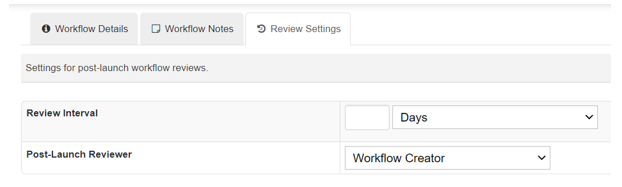
Step 6: In here you can set the review internal for the workflow and assign who gets notified to complete the post launch review
Step 7: When workflow reaches status “Pending Review”, an email will be sent to the selected user to review the form. A link will also be added to the assigned users task list which when clicked will open the form to be completed.
