- Knowledge Base
- Specification Manager
- Creating And Managing Company Specifications
-
FAQs
-
Activation Process
-
One Pagers
-
Document Request Manager
-
Settings- Company Settings
-
Settings- Company Users Email & Security
-
Supply Chain Manager
-
Product Check Manager
-
Internal Document Manager
-
Production Models
-
Supplier Manager
-
Settings- Manage Products
-
Supplier Questionnaire Manager
-
Supplier Check Manager
-
Supplier Document Manager
- Tool Documentation
- Initial Setup of Supplier Document Manager
- Creating A Supplier Document Template
- Building The Document
- Approving The Document Internally Before Sending Out
- Delete Documents
- View Selected
- Sharing A Document With Suppliers To Sign Off
- Exceptions
- Sign Off Review
- Viewing A Customer Document
- Sign Off The Document
- Assign Responsibility
- Delete/Reject Selected
- Receiving & Viewing An Exception
-
Risk Assessment Manager
-
Incident Manager
- Tool Documentation
- Initial Setup
- Create Incident Forms – Supplier & Customer Confirmations
- Edit Incident Forms – Supplier & Customer Confirmations
- RASFF Notifications
- Create An Incident From The RASFF Notifications
- View Incident
- Edit Incident
- Share An Incident
- View Company Incident Shares
- View Responses From Supplier
- Request More Info
- Respond To Incident/Confirm/Close Out Incident
- Supplier Side Incident Manager
-
Remote Audit Manager
-
Specification Manager
- Tool Documentation
- Initial Setup For Specification Manager
- Creating Specification Templates
- Creating And Managing Company Specifications
- Creating and Managing Collaborative Specifications
- Creating and Managing Ingredient Specifications
- Sharing and Managing External Specifications
- Providing Customer Access To Linked Specifications
- Managing Specification Exceptions
- Viewing Specifications On The App
-
Customer Complaint Manager
-
Internal Check Manager
-
Workflow Manager
-
Stock Manager
-
Forecast Manager
-
Order Manager
-
Meeting Notes Manager
-
Customer Tool Guides
-
Traceability Manager
-
Supplier Audit Manager
- Tool Documentation
- Initial Setup
- Building A Custom Audit
- Using And Completing An Audit
- Update An Audit
- Request An Internal Review
- Mark Audit As Complete
- Notify Team Members
- Send PDF Report
- Export Full Audit Table To PDF
- Export Full Audit Table To Excel
- Recall Audit
- Reopen Audit
- Managing Activity Subscriptions
- Supplier Provided Audits
-
Purchasing & Sales Manager
-
Visit & Audit Schedule
-
Formbuilder
3.1. Creating A Company Specification
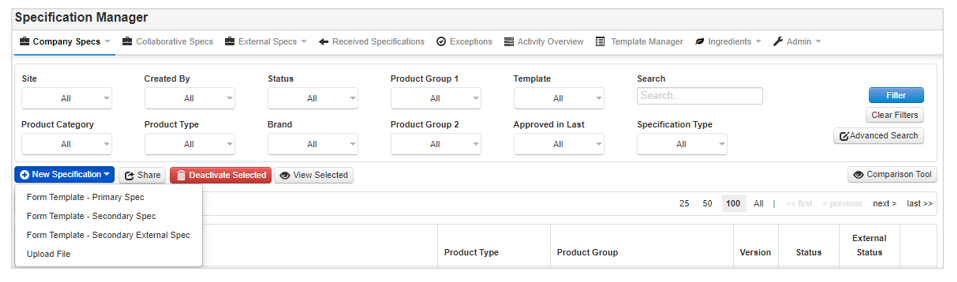
Step 1 Select Quality Management tab and select Specification Manager. Select the Company Specs tab and click on New Specification. Customers will see the various options:
Primary Spec – create a specification with no prepopulated information specifications or complete specific fields to populate information required for a Secondary Spec.
Secondary Spec – prepopulates information from a Primary Spec that has been created.
Secondary External Spec – prepopulates selected information from external specs.
Upload File - upload specification files into Foods Connected.
Suppliers will only have the option to create a primary spec from customer shared templates.
Step 2: Select your relevant option and then a page will open to set your specification details. Select the specification site, template, and product. The supplier and customer options are not mandatory.
If you are creating a specification in response to a request from your customer, you will select the template and product that your customer shared with you through the system. You can link your own product details to the specification by using the Quick Add Product button.

If you have the auto generate product codes option switched on in your product file settings, when you use the Quick Add Product function, the product code will automatically generate based of the prefix and seed you have set.
*Select ‘Raw Material’ for Type unless you are creating a specification for a finished product, see section 3.12 for steps on creating a finished product specification.
Step 3: Click on Save & Build Specification to open the template, fill in your specification details using the Save button to save your progress.

