- Knowledge Base
- Supplier Audit Manager
- Using And Completing An Audit
-
FAQs
-
Activation Process
-
One Pagers
-
Document Request Manager
-
Settings- Company Settings
-
Settings- Company Users Email & Security
-
Supply Chain Manager
-
Product Check Manager
-
Internal Document Manager
-
Production Models
-
Supplier Manager
-
Settings- Manage Products
-
Supplier Questionnaire Manager
-
Supplier Check Manager
-
Supplier Document Manager
- Tool Documentation
- Initial Setup of Supplier Document Manager
- Creating A Supplier Document Template
- Building The Document
- Approving The Document Internally Before Sending Out
- Delete Documents
- View Selected
- Sharing A Document With Suppliers To Sign Off
- Exceptions
- Sign Off Review
- Viewing A Customer Document
- Sign Off The Document
- Assign Responsibility
- Delete/Reject Selected
- Receiving & Viewing An Exception
-
Risk Assessment Manager
-
Incident Manager
- Tool Documentation
- Initial Setup
- Create Incident Forms – Supplier & Customer Confirmations
- Edit Incident Forms – Supplier & Customer Confirmations
- RASFF Notifications
- Create An Incident From The RASFF Notifications
- View Incident
- Edit Incident
- Share An Incident
- View Company Incident Shares
- View Responses From Supplier
- Request More Info
- Respond To Incident/Confirm/Close Out Incident
- Supplier Side Incident Manager
-
Remote Audit Manager
-
Specification Manager
- Tool Documentation
- Initial Setup For Specification Manager
- Creating Specification Templates
- Creating And Managing Company Specifications
- Creating and Managing Collaborative Specifications
- Creating and Managing Ingredient Specifications
- Sharing and Managing External Specifications
- Providing Customer Access To Linked Specifications
- Managing Specification Exceptions
- Viewing Specifications On The App
-
Customer Complaint Manager
-
Internal Check Manager
-
Workflow Manager
-
Stock Manager
-
Forecast Manager
-
Order Manager
-
Meeting Notes Manager
-
Customer Tool Guides
-
Traceability Manager
-
Supplier Audit Manager
- Tool Documentation
- Initial Setup
- Building A Custom Audit
- Using And Completing An Audit
- Update An Audit
- Request An Internal Review
- Mark Audit As Complete
- Notify Team Members
- Send PDF Report
- Export Full Audit Table To PDF
- Export Full Audit Table To Excel
- Recall Audit
- Reopen Audit
- Managing Activity Subscriptions
- Supplier Provided Audits
-
Purchasing & Sales Manager
-
Visit & Audit Schedule
-
Formbuilder
3.1 Completing On Desktop
Step 1: Sign in go to the Supplier Audit Manager, then select Add New Audit

Step 2: Add details of the audit below. And select Save when done

Step 3: In the audit overview tab you can attach documents and add comments. Select Save when done. If you need to change the audit details, select the Update Audit Details and follow the steps as above again.

Step 4: Now select the Audit Form tab

Step 5: Answer the questions on this page and select Save

Step 6: Now select the Checklists tab

Step 7: Complete the checklist. Depending on your checklist setup it may open a comment box and create an audit item or NC

Step 8: After you complete the checklist select Save when done.

Step 9: As you can see when you save it has created an audit item automatically. This is because of the way you have setup. You can create an audit item in the next tab and complete the details of that one.

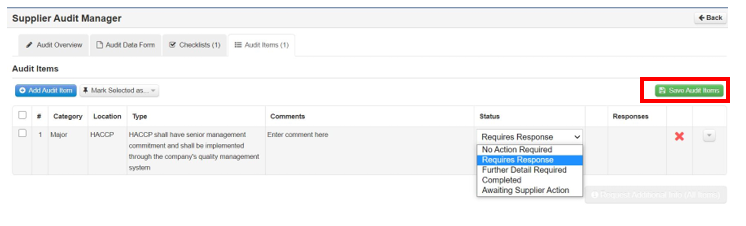
Step 10: Select the Audit Items tab

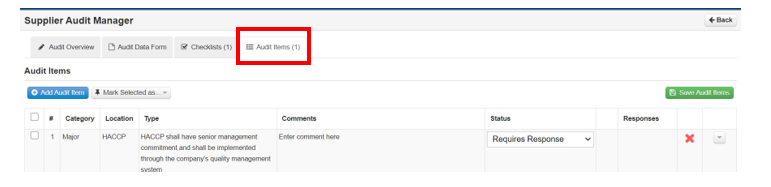
Step 11: To add further details to the audit item or edit the details select the edit button

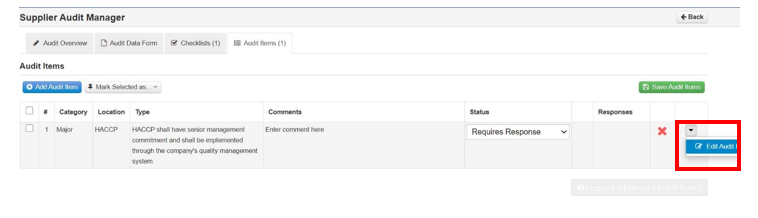
Step 12: This is the audit item form, you can change or correct the details here, add comments and add pictures. When done select Update

Step 13: You can change the Status here as well from the dropdown. When done select Save Audit Items
