- Knowledge Base
- Specification Manager
- Creating Specification Templates
-
FAQs
-
Activation Process
-
One Pagers
-
Document Request Manager
-
Settings- Company Settings
-
Settings- Company Users Email & Security
-
Supply Chain Manager
-
Product Check Manager
-
Internal Document Manager
-
Production Models
-
Supplier Manager
-
Settings- Manage Products
-
Supplier Questionnaire Manager
-
Supplier Check Manager
-
Supplier Document Manager
- Tool Documentation
- Initial Setup of Supplier Document Manager
- Creating A Supplier Document Template
- Building The Document
- Approving The Document Internally Before Sending Out
- Delete Documents
- View Selected
- Sharing A Document With Suppliers To Sign Off
- Exceptions
- Sign Off Review
- Viewing A Customer Document
- Sign Off The Document
- Assign Responsibility
- Delete/Reject Selected
- Receiving & Viewing An Exception
-
Risk Assessment Manager
-
Incident Manager
- Tool Documentation
- Initial Setup
- Create Incident Forms – Supplier & Customer Confirmations
- Edit Incident Forms – Supplier & Customer Confirmations
- RASFF Notifications
- Create An Incident From The RASFF Notifications
- View Incident
- Edit Incident
- Share An Incident
- View Company Incident Shares
- View Responses From Supplier
- Request More Info
- Respond To Incident/Confirm/Close Out Incident
- Supplier Side Incident Manager
-
Remote Audit Manager
-
Specification Manager
- Tool Documentation
- Initial Setup For Specification Manager
- Creating Specification Templates
- Creating And Managing Company Specifications
- Creating and Managing Collaborative Specifications
- Creating and Managing Ingredient Specifications
- Sharing and Managing External Specifications
- Providing Customer Access To Linked Specifications
- Managing Specification Exceptions
- Viewing Specifications On The App
-
Customer Complaint Manager
-
Internal Check Manager
-
Workflow Manager
-
Stock Manager
-
Forecast Manager
-
Order Manager
-
Meeting Notes Manager
-
Customer Tool Guides
-
Traceability Manager
-
Supplier Audit Manager
- Tool Documentation
- Initial Setup
- Building A Custom Audit
- Using And Completing An Audit
- Update An Audit
- Request An Internal Review
- Mark Audit As Complete
- Notify Team Members
- Send PDF Report
- Export Full Audit Table To PDF
- Export Full Audit Table To Excel
- Recall Audit
- Reopen Audit
- Managing Activity Subscriptions
- Supplier Provided Audits
-
Purchasing & Sales Manager
-
Visit & Audit Schedule
-
Formbuilder
2.13 Adding Translations Into A Specification Template
For each specification template, you can add translations so the template will display in the user’s default locale.
Step 1: Select Quality Management tab and select Specification Manager. Select the Template Manager tab and from the Options menu beside your specification, click on Template Settings.

Step 2: Select your default locale and click on Save Settings. This will be the main language of the template that you translate from.

Step 3: From the Template Manager tab of Specification Manager, select Edit Template from your template options menu.

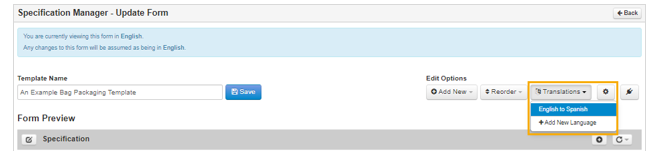
Step 4: Click on the translations button at the top of the page and select Add New Language. A pop-up window will open for you to select your language, pick the language from the dropdown and click on Next.


Step 5: A page will open with your field names and a textbox to complete the translation; this can be filled in manually or you can use the Translate button. If you use the translate button, you can still manually edit the translations where required.
*Clicking on Translate after you have manually filled in translations will overwrite what has already been filled in.*
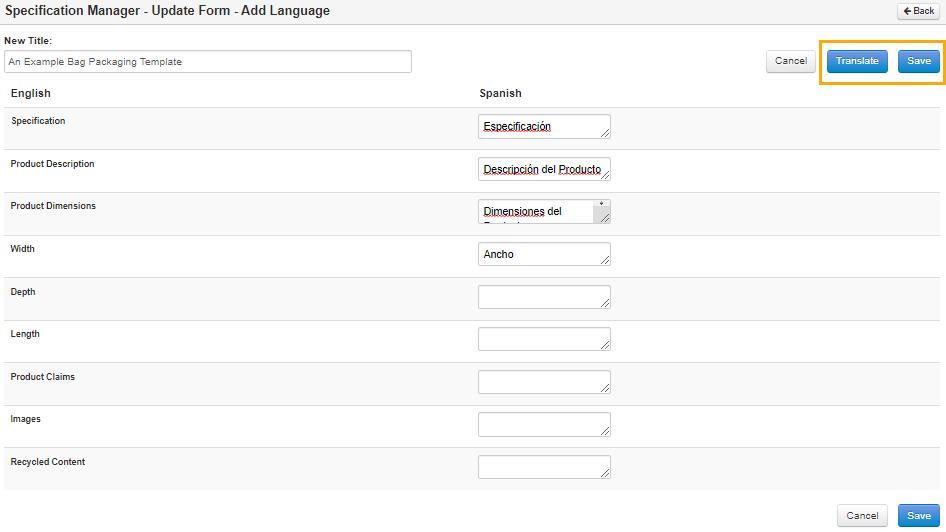
Step 6: Once you have filled in the translations, click on Save to complete adding on the translation.
Step 7: After you have added on a translation, it will show under the Translations button for you to edit and update as required. Also, every time new fields/sections are added into the form, the translate page will open automatically for you to add the relevant translations.

Once you have set up your translation, if a user has that language set as their default locale in their user profile settings, the specification will display in that language.
The same setup can be completed for the other linked specification forms - confirmation, risk assessment, vulnerability and raw material breakdown.
