Step 1: Select the three bars then click edit as per the below screenshot.

Step 2: Now click update template information as per the below.
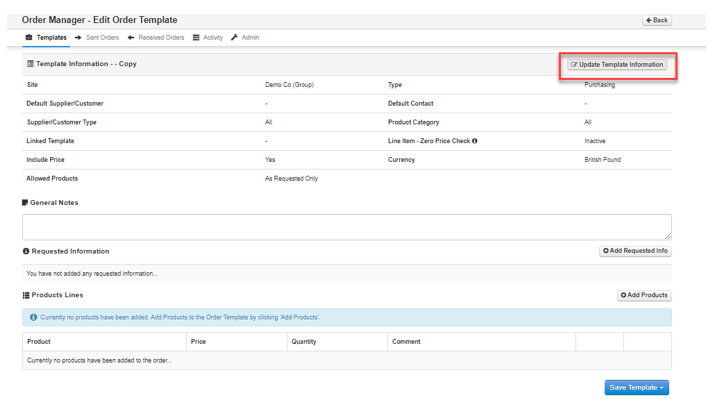
Step 3: Selecting the update template information will allow you to go in and edit details in the template. What each field represents was shown earlier in the guide 1.2 Creating a Order Template.

Step 4: To issue an order select issue order under the template heading as per the below.

Step 5: Once selecting issue order the screen will take you to the template which is ready to populate the information.
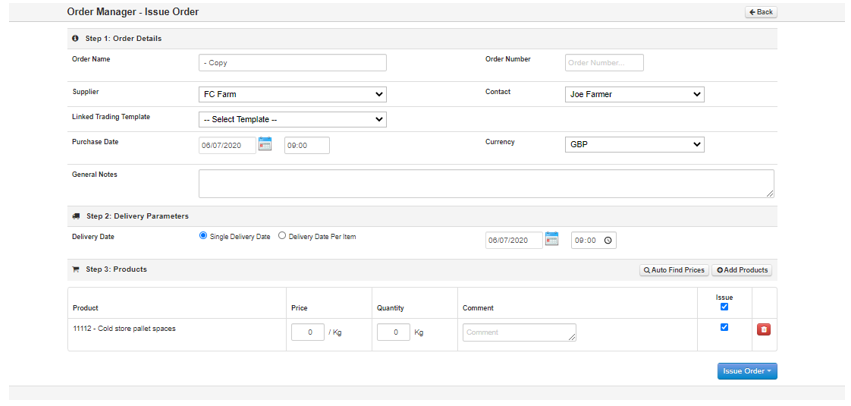
Order Name: Select the site that the template applies to
Order Number: This will either be pre-populated or you can enter an order number based on the setting configured in the admin section
Supplier: Select the supplier who the order is for
Contact: Select the contact that you would like to send the order to, from the supplier selected.
Linked Trading Template: If the order relates to a previously sent contract please link the respective trading template.
Purchase Date: The date of purchase
Delivery Date: The date of delivery, this can be set as one single delivery date or individual delivery dates per order item.
General Notes: Input additional notes relevant to the order: e.g. Ensure pallet’s are double wrapped
Auto Find prices: If the order is linked to a pre confirmed contract then selecting auto find prices will pull in the prices from the contract.
Add products: Add in additional products to the order if needed.
Issue: Allows you to tick which products you would like to send on the order
Price/Quantity: Update as required
Step 6: After adding in the product lines users can add in link products by selecting the plus sign on the template as per the below. Selecting the plus sign will then allow the user to select the linked product from the drop-down menu. Once selecting the product, the user can add in key fields such as price, unit of measure and tax. To set these linked products up the user will need to go into settings, product file and create a new one. The linked product will automatically populate based on the unit of measure. If for example it is linked to per head, once the confirmation note with actual kill data is uploaded the linked product will populate based on the confirmed quantity.

Step 7: Once you have populated the data for the order, select issue order at the bottom of the screen. You will have two options. The first selecting a negotiation order, if this option is selected the order will be sent to the supplier for negotiation (e.g. for them to confirm or counter the requested amounts). The second option is to select a pre-confirmed order which will not open the template for negotiation with the supplier.
