- Knowledge Base
- Stock Manager
- Setup & Admin
-
FAQs
-
Activation Process
-
One Pagers
-
Document Request Manager
-
Settings- Company Settings
-
Settings- Company Users Email & Security
-
Supply Chain Manager
-
Product Check Manager
-
Internal Document Manager
-
Production Models
-
Supplier Manager
-
Settings- Manage Products
-
Supplier Questionnaire Manager
-
Supplier Check Manager
-
Supplier Document Manager
- Tool Documentation
- Initial Setup of Supplier Document Manager
- Creating A Supplier Document Template
- Building The Document
- Approving The Document Internally Before Sending Out
- Delete Documents
- View Selected
- Sharing A Document With Suppliers To Sign Off
- Exceptions
- Sign Off Review
- Viewing A Customer Document
- Sign Off The Document
- Assign Responsibility
- Delete/Reject Selected
- Receiving & Viewing An Exception
-
Risk Assessment Manager
-
Incident Manager
- Tool Documentation
- Initial Setup
- Create Incident Forms – Supplier & Customer Confirmations
- Edit Incident Forms – Supplier & Customer Confirmations
- RASFF Notifications
- Create An Incident From The RASFF Notifications
- View Incident
- Edit Incident
- Share An Incident
- View Company Incident Shares
- View Responses From Supplier
- Request More Info
- Respond To Incident/Confirm/Close Out Incident
- Supplier Side Incident Manager
-
Remote Audit Manager
-
Specification Manager
- Tool Documentation
- Initial Setup For Specification Manager
- Creating Specification Templates
- Creating And Managing Company Specifications
- Creating and Managing Collaborative Specifications
- Creating and Managing Ingredient Specifications
- Sharing and Managing External Specifications
- Providing Customer Access To Linked Specifications
- Managing Specification Exceptions
- Viewing Specifications On The App
-
Customer Complaint Manager
-
Internal Check Manager
-
Workflow Manager
-
Stock Manager
-
Forecast Manager
-
Order Manager
-
Meeting Notes Manager
-
Customer Tool Guides
-
Traceability Manager
-
Supplier Audit Manager
- Tool Documentation
- Initial Setup
- Building A Custom Audit
- Using And Completing An Audit
- Update An Audit
- Request An Internal Review
- Mark Audit As Complete
- Notify Team Members
- Send PDF Report
- Export Full Audit Table To PDF
- Export Full Audit Table To Excel
- Recall Audit
- Reopen Audit
- Managing Activity Subscriptions
- Supplier Provided Audits
-
Purchasing & Sales Manager
-
Visit & Audit Schedule
-
Formbuilder
2.1 How To Enable/Disable The ‘Operational Ready Flag’ Validation Rules
A product becomes ‘Operational Ready’ automatically once the relevant Workflow Manager process has been completed and reached an approved status in the system. It confirms that all master data setup requirements for the product have been completed in SAP.
Enabling the ‘Operational Ready Flag’ validation settings will ensure that:
- Users cannot complete manual stock updates for products which are not Operational Ready.
- Users cannot use the Adjust Stock button for products which are not Operational Ready.
- Users cannot approve supplier stock update requests which contain products which are not Operational Ready.
To Enable:
Step 1: Ensure you have ‘Admin’ access to the Company Product File. This will need to be setup by Foods Connected.
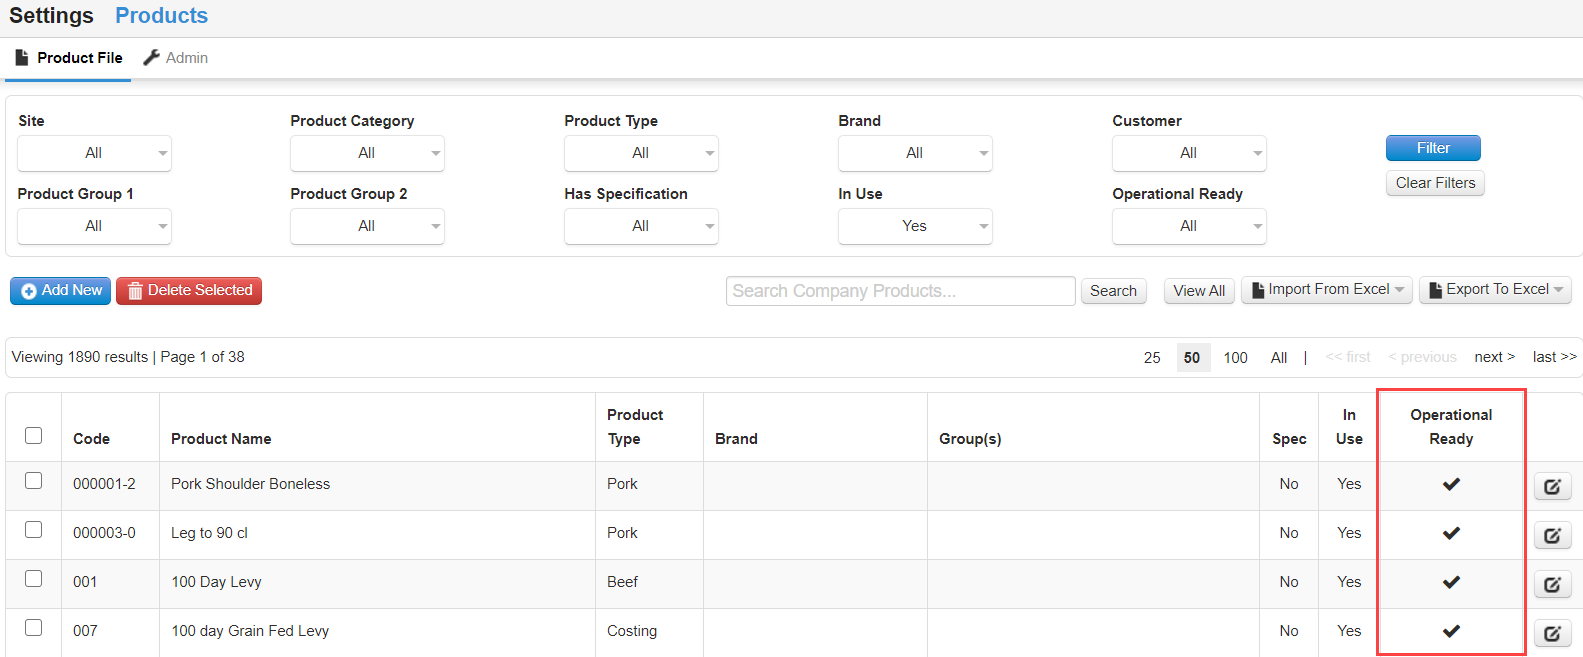
Step 2: Select the Settings toggle > then select the Company Product File.
Step 3: Select the Admin tab > switch the ‘Operational Ready Flag’ setting option to Yes > select the Save Settings button.
Step 4: Select the Product File tab.
Step 5: The system should now display the new Operational Ready status column against each article.
To Disable:
In Step 3: Select the Admin tab > switch the ‘Operational Ready Flag’ setting option to No > select the Save Settings button.


