- Knowledge Base
- Supplier Manager
- Adding a New Supplier
-
FAQs
-
Activation Process
-
One Pagers
-
Document Request Manager
-
Settings- Company Settings
-
Settings- Company Users Email & Security
-
Supply Chain Manager
-
Product Check Manager
-
Internal Document Manager
-
Production Models
-
Supplier Manager
-
Settings- Manage Products
-
Supplier Questionnaire Manager
-
Supplier Check Manager
-
Supplier Document Manager
- Tool Documentation
- Initial Setup of Supplier Document Manager
- Creating A Supplier Document Template
- Building The Document
- Approving The Document Internally Before Sending Out
- Delete Documents
- View Selected
- Sharing A Document With Suppliers To Sign Off
- Exceptions
- Sign Off Review
- Viewing A Customer Document
- Sign Off The Document
- Assign Responsibility
- Delete/Reject Selected
- Receiving & Viewing An Exception
-
Risk Assessment Manager
-
Incident Manager
- Tool Documentation
- Initial Setup
- Create Incident Forms – Supplier & Customer Confirmations
- Edit Incident Forms – Supplier & Customer Confirmations
- RASFF Notifications
- Create An Incident From The RASFF Notifications
- View Incident
- Edit Incident
- Share An Incident
- View Company Incident Shares
- View Responses From Supplier
- Request More Info
- Respond To Incident/Confirm/Close Out Incident
- Supplier Side Incident Manager
-
Remote Audit Manager
-
Specification Manager
- Tool Documentation
- Initial Setup For Specification Manager
- Creating Specification Templates
- Creating And Managing Company Specifications
- Creating and Managing Collaborative Specifications
- Creating and Managing Ingredient Specifications
- Sharing and Managing External Specifications
- Providing Customer Access To Linked Specifications
- Managing Specification Exceptions
- Viewing Specifications On The App
-
Customer Complaint Manager
-
Internal Check Manager
-
Workflow Manager
-
Stock Manager
-
Forecast Manager
-
Order Manager
-
Meeting Notes Manager
-
Customer Tool Guides
-
Traceability Manager
-
Supplier Audit Manager
- Tool Documentation
- Initial Setup
- Building A Custom Audit
- Using And Completing An Audit
- Update An Audit
- Request An Internal Review
- Mark Audit As Complete
- Notify Team Members
- Send PDF Report
- Export Full Audit Table To PDF
- Export Full Audit Table To Excel
- Recall Audit
- Reopen Audit
- Managing Activity Subscriptions
- Supplier Provided Audits
-
Purchasing & Sales Manager
-
Visit & Audit Schedule
-
Formbuilder
2. Adding A New Supplier
After setup is complete the next step is to add your Suppliers to your Supplier List.
There are two options for adding suppliers,
- Add Individual suppliers one at a time (most beneficial for updating a Supplier List).
- Adding bulk supplier (most beneficial when you have a new supplier list with numerous suppliers being added)
Add Individual Suppliers
Step 1: Go to the Supplier Manager under the Supplier Approval Tab select Supplier List

Step 2: Select Add New

Step 3: Type in your supplier name & select Search.
NOTE: It is good practice to search for part name as well as different spelling in case it might already be in the database.

Step 4: If the supplier is currently on Foods Connected it will appear in the list to select, if the supplier is not in the database it will give you the option to request a new supplier. This request will go to the Foods Connected Support team for review & approval.

If the company already exists complete the data tabs and Request Supplier
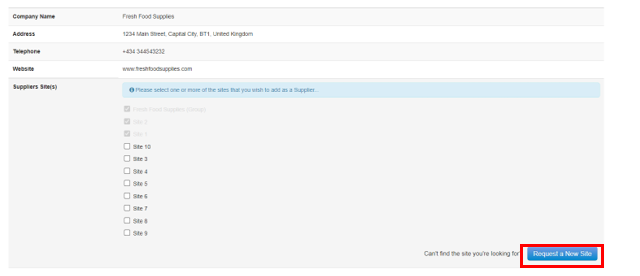
If the company already exists but the site you require is not available you can request a new site to be added which will go to the support team for approval.

Step 5: If supplier is not there select Add New Company as Supplier

Step 6: Add the Supplier details and select Request Supplier, this will then go for approval to Foods Connected support team and you will be notified when the supplier has been approved.


Note the Optional fields are Mandatory they need to be selected when adding a supplier
Add Bulk Suppliers
Step 1: Go to the Supplier Manager under the Supplier Approval Tab select Supplier List

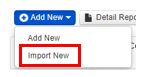
Step 2: Select Add New & Import New

Step 3: Export the template for Importing.

Step 4: Fill in as much detail as possible populating all the data relating to your supplier Manager Columns (note All columns highlighted in grey must be filled in or the import won't work) and save the file to your computer.

Step 5: Select Import and choose the file you have saved upload the file

Step 6: The supplier list will now Import and any incorrect data or Suppliers that may already Exist will be highlighted, you can fix the Errors and reimport if needed.
