- Knowledge Base
- Purchasing & Sales Manager
- Initial Setup For Purchasing & Sales Manager
-
FAQs
-
Activation Process
-
One Pagers
-
Document Request Manager
-
Settings- Company Settings
-
Settings- Company Users Email & Security
-
Supply Chain Manager
-
Product Check Manager
-
Internal Document Manager
-
Production Models
-
Supplier Manager
-
Settings- Manage Products
-
Supplier Questionnaire Manager
-
Supplier Check Manager
-
Supplier Document Manager
- Tool Documentation
- Initial Setup of Supplier Document Manager
- Creating A Supplier Document Template
- Building The Document
- Approving The Document Internally Before Sending Out
- Delete Documents
- View Selected
- Sharing A Document With Suppliers To Sign Off
- Exceptions
- Sign Off Review
- Viewing A Customer Document
- Sign Off The Document
- Assign Responsibility
- Delete/Reject Selected
- Receiving & Viewing An Exception
-
Risk Assessment Manager
-
Incident Manager
- Tool Documentation
- Initial Setup
- Create Incident Forms – Supplier & Customer Confirmations
- Edit Incident Forms – Supplier & Customer Confirmations
- RASFF Notifications
- Create An Incident From The RASFF Notifications
- View Incident
- Edit Incident
- Share An Incident
- View Company Incident Shares
- View Responses From Supplier
- Request More Info
- Respond To Incident/Confirm/Close Out Incident
- Supplier Side Incident Manager
-
Remote Audit Manager
-
Specification Manager
- Tool Documentation
- Initial Setup For Specification Manager
- Creating Specification Templates
- Creating And Managing Company Specifications
- Creating and Managing Collaborative Specifications
- Creating and Managing Ingredient Specifications
- Sharing and Managing External Specifications
- Providing Customer Access To Linked Specifications
- Managing Specification Exceptions
- Viewing Specifications On The App
-
Customer Complaint Manager
-
Internal Check Manager
-
Workflow Manager
-
Stock Manager
-
Forecast Manager
-
Order Manager
-
Meeting Notes Manager
-
Customer Tool Guides
-
Traceability Manager
-
Supplier Audit Manager
- Tool Documentation
- Initial Setup
- Building A Custom Audit
- Using And Completing An Audit
- Update An Audit
- Request An Internal Review
- Mark Audit As Complete
- Notify Team Members
- Send PDF Report
- Export Full Audit Table To PDF
- Export Full Audit Table To Excel
- Recall Audit
- Reopen Audit
- Managing Activity Subscriptions
- Supplier Provided Audits
-
Purchasing & Sales Manager
-
Visit & Audit Schedule
-
Formbuilder
1.4. Quick Send Settings
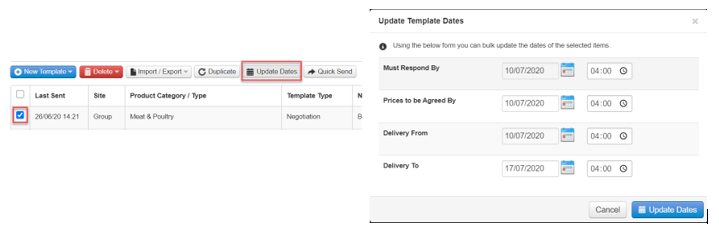
Once templates have been created it is possible to update basic information quickly and issue these to a pre-set list of suppliers/customers. This is completed using the Update Dates and Quick Send options, which can be performed on multiple templates.
Step 1: Update Dates, select the relevant templates and click Update Dates from here a popup will load and you will be able to amend the date parameters:

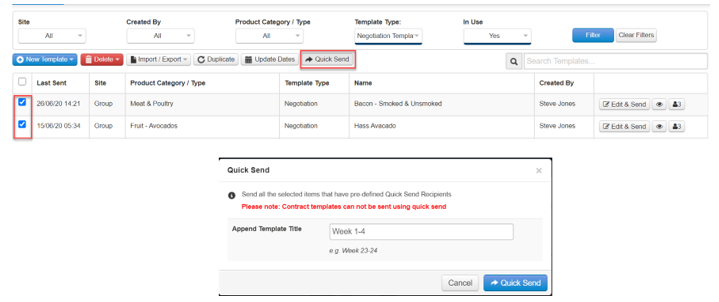
Step 2: Quick Send Recipients, When a template is first created it is important to add the quick send recipients. Click the person button to the right of the template:
![]()
This will open a popup where you can select the supplier, user and type of response required, adding this will create a list of suppliers who the template can be shared with in one instance. This can be updated at any time using the same process and deleting the selected share and re-adding.

Once quick send recipients have been added the number will show next to the person button indicating how many people will receive the negotiation. The eye button allows a preview of how the template has been configures and will be seen by the recipients.

Step 3: Quick Send, Once update dates and quick send recipients have been completed, select the templates you wish to issue and click Quick Send – you will be prompted to append template title where you can add detail specific to that event e.g. weeks

After sending you will receive a green confirmation message and can then check the events by selecting the appropriate Sent Negotiation, Sent Promotion, Sent Contract section:
