- Knowledge Base
- Purchasing & Sales Manager
- Initial Setup For Purchasing & Sales Manager
-
FAQs
-
Activation Process
-
One Pagers
-
Document Request Manager
-
Settings- Company Settings
-
Settings- Company Users Email & Security
-
Supply Chain Manager
-
Product Check Manager
-
Internal Document Manager
-
Production Models
-
Supplier Manager
-
Settings- Manage Products
-
Supplier Questionnaire Manager
-
Supplier Check Manager
-
Supplier Document Manager
- Tool Documentation
- Initial Setup of Supplier Document Manager
- Creating A Supplier Document Template
- Building The Document
- Approving The Document Internally Before Sending Out
- Delete Documents
- View Selected
- Sharing A Document With Suppliers To Sign Off
- Exceptions
- Sign Off Review
- Viewing A Customer Document
- Sign Off The Document
- Assign Responsibility
- Delete/Reject Selected
- Receiving & Viewing An Exception
-
Risk Assessment Manager
-
Incident Manager
- Tool Documentation
- Initial Setup
- Create Incident Forms – Supplier & Customer Confirmations
- Edit Incident Forms – Supplier & Customer Confirmations
- RASFF Notifications
- Create An Incident From The RASFF Notifications
- View Incident
- Edit Incident
- Share An Incident
- View Company Incident Shares
- View Responses From Supplier
- Request More Info
- Respond To Incident/Confirm/Close Out Incident
- Supplier Side Incident Manager
-
Remote Audit Manager
-
Specification Manager
- Tool Documentation
- Initial Setup For Specification Manager
- Creating Specification Templates
- Creating And Managing Company Specifications
- Creating and Managing Collaborative Specifications
- Creating and Managing Ingredient Specifications
- Sharing and Managing External Specifications
- Providing Customer Access To Linked Specifications
- Managing Specification Exceptions
- Viewing Specifications On The App
-
Customer Complaint Manager
-
Internal Check Manager
-
Workflow Manager
-
Stock Manager
-
Forecast Manager
-
Order Manager
-
Meeting Notes Manager
-
Customer Tool Guides
-
Traceability Manager
-
Supplier Audit Manager
- Tool Documentation
- Initial Setup
- Building A Custom Audit
- Using And Completing An Audit
- Update An Audit
- Request An Internal Review
- Mark Audit As Complete
- Notify Team Members
- Send PDF Report
- Export Full Audit Table To PDF
- Export Full Audit Table To Excel
- Recall Audit
- Reopen Audit
- Managing Activity Subscriptions
- Supplier Provided Audits
-
Purchasing & Sales Manager
-
Visit & Audit Schedule
-
Formbuilder
1.2. Creating A Template
Purchasing and Sales templates can be created to store initial setup information for the different events to help of the speed of updating and issuing to suppliers and customers.
Step 1: Go to the Purchasing Tool and select Purchasing Templates. This will display all current templates that have been created. To create a new template, click the blue ‘New Template’ button and select the type of template you would like to create.

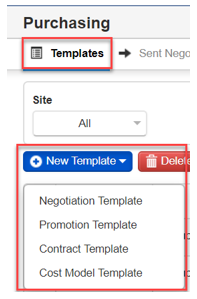
- Negotiation Template
Are designed to allow the back and forwards between suppliers & customers through Foods Connected to agree volumes and prices for individual products
- Promotion Template
Are designed to allow the back and forwards between suppliers & customers through Foods Connected to agree volumes and prices for individual products that sit outside the normal negotiations. It also allows suppliers to suggest non requested products and prices in addition.
- Contract Template
Are designed to allow the agreements of contracts for longer periods of time to be captured in the system. This can also allow for items which have already been agreed to be captured in a central location.
- Cost Model Template
Are designed for the complex deconstruction of carcases into individual components and balancing of cost and prices associated.
Step 2: Negotiation and Promotion Templates, after selecting the type of template you would like to create the below template configuration pop up will appear:
Step 3: Contract Templates, after selecting the type of template you would like to create the below template configuration pop up will appear:

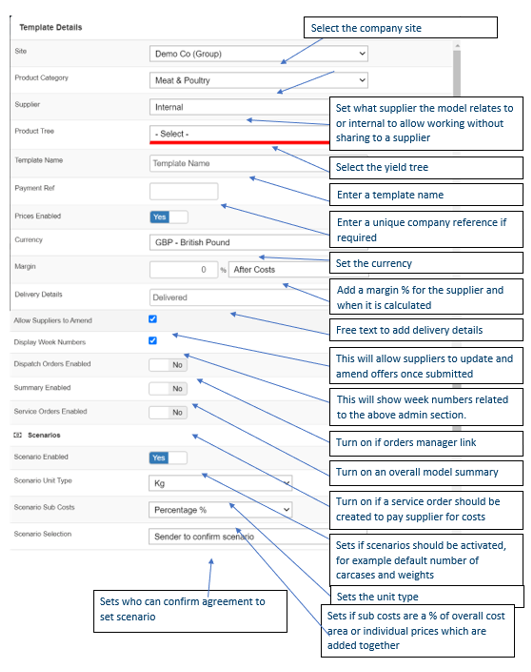
Step 4: Cost Model Templates, after selecting the type of template you would like to create the below template configuration pop up will appear:


