- Knowledge Base
- Settings- Company Users Email & Security
- Company Users, Email & Security
-
FAQs
-
Activation Process
-
One Pagers
-
Document Request Manager
-
Settings- Company Settings
-
Settings- Company Users Email & Security
-
Supply Chain Manager
-
Product Check Manager
-
Internal Document Manager
-
Production Models
-
Supplier Manager
-
Settings- Manage Products
-
Supplier Questionnaire Manager
-
Supplier Check Manager
-
Supplier Document Manager
- Tool Documentation
- Initial Setup of Supplier Document Manager
- Creating A Supplier Document Template
- Building The Document
- Approving The Document Internally Before Sending Out
- Delete Documents
- View Selected
- Sharing A Document With Suppliers To Sign Off
- Exceptions
- Sign Off Review
- Viewing A Customer Document
- Sign Off The Document
- Assign Responsibility
- Delete/Reject Selected
- Receiving & Viewing An Exception
-
Risk Assessment Manager
-
Incident Manager
- Tool Documentation
- Initial Setup
- Create Incident Forms – Supplier & Customer Confirmations
- Edit Incident Forms – Supplier & Customer Confirmations
- RASFF Notifications
- Create An Incident From The RASFF Notifications
- View Incident
- Edit Incident
- Share An Incident
- View Company Incident Shares
- View Responses From Supplier
- Request More Info
- Respond To Incident/Confirm/Close Out Incident
- Supplier Side Incident Manager
-
Remote Audit Manager
-
Specification Manager
- Tool Documentation
- Initial Setup For Specification Manager
- Creating Specification Templates
- Creating And Managing Company Specifications
- Creating and Managing Collaborative Specifications
- Creating and Managing Ingredient Specifications
- Sharing and Managing External Specifications
- Providing Customer Access To Linked Specifications
- Managing Specification Exceptions
- Viewing Specifications On The App
-
Customer Complaint Manager
-
Internal Check Manager
-
Workflow Manager
-
Stock Manager
-
Forecast Manager
-
Order Manager
-
Meeting Notes Manager
-
Customer Tool Guides
-
Traceability Manager
-
Supplier Audit Manager
- Tool Documentation
- Initial Setup
- Building A Custom Audit
- Using And Completing An Audit
- Update An Audit
- Request An Internal Review
- Mark Audit As Complete
- Notify Team Members
- Send PDF Report
- Export Full Audit Table To PDF
- Export Full Audit Table To Excel
- Recall Audit
- Reopen Audit
- Managing Activity Subscriptions
- Supplier Provided Audits
-
Purchasing & Sales Manager
-
Visit & Audit Schedule
-
Formbuilder
1.1. Manage Users
Step 1: Log in to your Foods Connected account
Step 2: Locate the settings tab in the top right-hand corner
Step 3: Navigate to ‘Manage Users’ under ‘Company Users, Email & Security’
Step 4: Users can be searched for; and filters can also be used as shown below
Step 5: Users can also be unlocked; passwords can be reset, and users can be invited using the buttons as shown below
Step 6: Name of users, their associated site, status, and access roles (Manage Company Profile, Manage Users, Email & Security and Manage Company Documents & Customers) can be viewed.
Step 7: User details can be edited using the ‘Update’ button drop down as noted below.
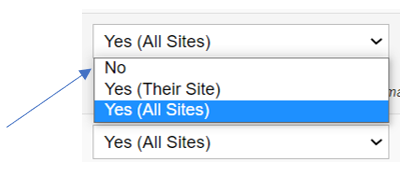
Step 8: When the ‘Edit User Details’ option is selected the following page appears- it shows name; email address, status and site. Accounts can be unlocked using the ‘Unlock’ button at the far side of ‘Status’. Access levels can also be controlled e.g. Manage Company Profile; the drop down can be used to select the appropriate access level as shown
Users can be removed and/or records can be transferred using the red button in the bottom right corner ‘Remove User/ Transfer Records’.
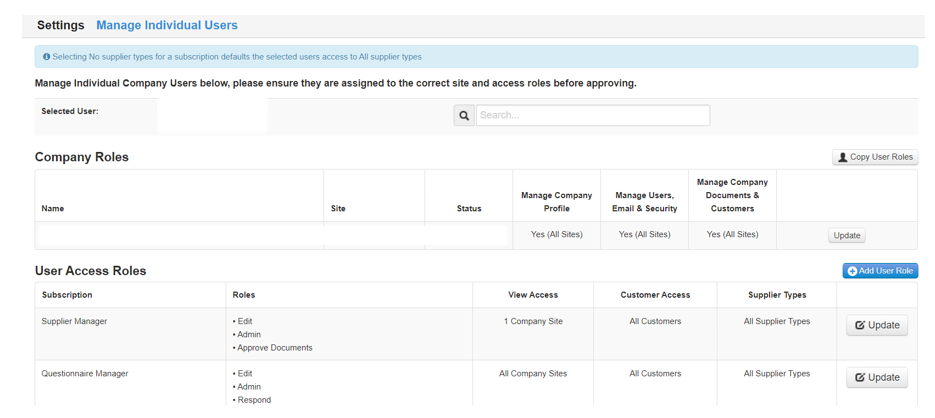
Step 9: When ‘Set User Access’ is selected the following page loads; selected users can be searched for using the search bar. Both ‘Company Roles’ and ‘User Access Roles’ per tool can be updated using the grey ‘Update’ button. New user roles can also be added by selecting the ‘Add User Role’ button.
Note Briefly:
Users can be provided access to all sites/their site only or specific sites.


