- Knowledge Base
- Purchasing & Sales Manager
- Pricing Grids
-
FAQs
-
Activation Process
-
One Pagers
-
Document Request Manager
-
Settings- Company Settings
-
Settings- Company Users Email & Security
-
Supply Chain Manager
-
Product Check Manager
-
Internal Document Manager
-
Production Models
-
Supplier Manager
-
Settings- Manage Products
-
Supplier Questionnaire Manager
-
Supplier Check Manager
-
Supplier Document Manager
- Tool Documentation
- Initial Setup of Supplier Document Manager
- Creating A Supplier Document Template
- Building The Document
- Approving The Document Internally Before Sending Out
- Delete Documents
- View Selected
- Sharing A Document With Suppliers To Sign Off
- Exceptions
- Sign Off Review
- Viewing A Customer Document
- Sign Off The Document
- Assign Responsibility
- Delete/Reject Selected
- Receiving & Viewing An Exception
-
Risk Assessment Manager
-
Incident Manager
- Tool Documentation
- Initial Setup
- Create Incident Forms – Supplier & Customer Confirmations
- Edit Incident Forms – Supplier & Customer Confirmations
- RASFF Notifications
- Create An Incident From The RASFF Notifications
- View Incident
- Edit Incident
- Share An Incident
- View Company Incident Shares
- View Responses From Supplier
- Request More Info
- Respond To Incident/Confirm/Close Out Incident
- Supplier Side Incident Manager
-
Remote Audit Manager
-
Specification Manager
- Tool Documentation
- Initial Setup For Specification Manager
- Creating Specification Templates
- Creating And Managing Company Specifications
- Creating and Managing Collaborative Specifications
- Creating and Managing Ingredient Specifications
- Sharing and Managing External Specifications
- Providing Customer Access To Linked Specifications
- Managing Specification Exceptions
- Viewing Specifications On The App
-
Customer Complaint Manager
-
Internal Check Manager
-
Workflow Manager
-
Stock Manager
-
Forecast Manager
-
Order Manager
-
Meeting Notes Manager
-
Customer Tool Guides
-
Traceability Manager
-
Supplier Audit Manager
- Tool Documentation
- Initial Setup
- Building A Custom Audit
- Using And Completing An Audit
- Update An Audit
- Request An Internal Review
- Mark Audit As Complete
- Notify Team Members
- Send PDF Report
- Export Full Audit Table To PDF
- Export Full Audit Table To Excel
- Recall Audit
- Reopen Audit
- Managing Activity Subscriptions
- Supplier Provided Audits
-
Purchasing & Sales Manager
-
Visit & Audit Schedule
-
Formbuilder
4.1. Creating A New Pricing Grid
Step 1: Pricing Grid, navigate to the pricing grid section which is located within the Trading and Planning area and select new pricing grid to be directed to the initial setup:

Step 2: Grid Details

Step 3: Grid Setup


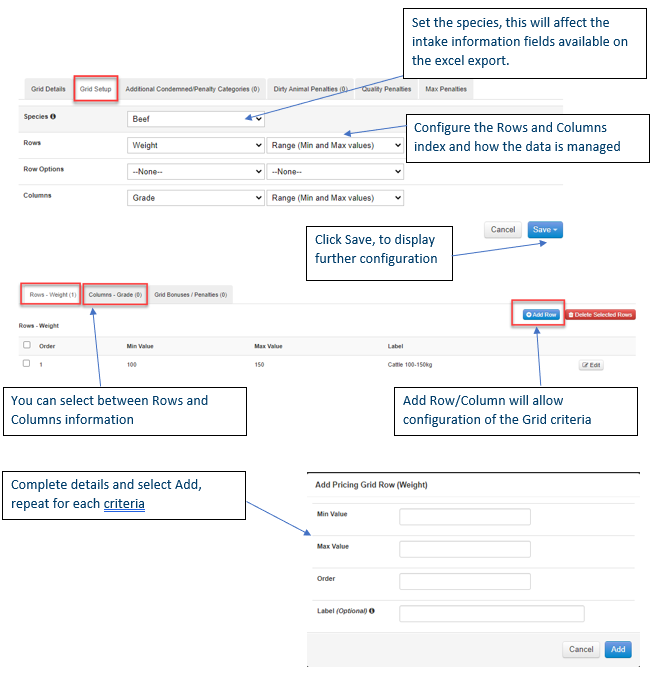
After updating all the grid setup click save.
Step 4: Grid Values, on the grid values section you can assign each bonus/penalty to the segments of the grid using the drop down. Once confirmed click save.

Step 5: Additional Condemned/Penalty Categories, here you can create additional categories of information you would like to collect on an animal level. These can have additional price penalties applied and can require a medical file to be attached if for example the animal was condemned.

Step 6: Dirty Animal Penalties, here you can create additional grades of information you would like to collect on an animal level, like the above however you can set is the deduction amount per kg or per head. This has been designed for Dirty Animal Penalties but could be used for other purposes.
Step 7: Quality Penalties, here you can create additional penalties which can be applied to the pricing grid, first select Add New and enter the penalty amount (this can be add as 0.10 or -0.10 as this is a penalty -0.10 will act as an additional amount).

Once the penalty has been added further configuration will be visible – allowing the rules to be created on how this is applied (click Add Rule).

Step 8: Max Penalties, like quality penalties the max penalties can be configured in the same method to set a maximum deduction that can be applied. This considers all penalties from the grid, additional condemned, dirty cattle and quality penalties and will cap the amount at the maximum set.

Step 9: Saving, once all configuration has been completed return Grid Detail and select save and exit to return to the template screen.
